How To Libreboot A Thinkpad T440p
Flashing tips, firmware construction and hardware teardown

If you need to refer to official docs for the t440p please see here.
Why Libreboot?
Libreboot is a firmware designed to replace the BIOS on a number of consumer devices, with the intention of creating a boot software that lives up to free software ideals (open-source, no binaries, free to use, modify and redistribute). One of the most famous features of Libreboot is its disabling of the Intel Management Engine, whichs runs with most Intel CPUs and some people consider to be a proprietary backdoor due to its complete memory access and unknown functionality.
By using Libreboot with a device that has hardware with only free drivers (such as the Thinkpad T440p once the wifi card is replaced), it is therefore possible to boot a consumer device and run a fully featured Linux system with very little proprietary code executed. This was my end goal with Libreboot, and was finalised by booting the Free Software Foundation’s Gnu Guix, which only allows systems with no proprietary drivers to run it.
![]()
Preparing The Firmware
To start are two important details:
- You MUST be on a Linux system to build the firmware (I used Debian, but they also support Fedora, Arch etc.)
- You SHOULD be on a matching instruction set to build your firmware (i.e. x86/x64 for most build targets), I originally attempted to use an ARM raspberry pi and was unable to assemble the final firmware
An important realisation is that in most of the docs libreboot will refer to flashing ‘Libreboot.bin’. This is actually a stand-in name for the particular bin file you produce for your device motherboard.
To create this bin file go the Downloads page on the Libreboot site, and on the HTTPS mirrors navigate to ‘stable/[latest version]/’ (as of now this is ‘26.01rev1/’). Download an unzip the ‘libreboot-[version]_src.tar.xz’ file, which contains the build tools, then go into the roms folder and find the correct ROM for your device, in my case this was ‘libreboot-[version]_t440plibremrc_12mb.tar.xz’, but do not unzip it!
We must first inject some original vendor files to support certain hardware. To do this you can follow the guide, producing the final binaries you can inject.
From there simply choose an appropriate binary (likely a SeaGRUB binary with the correct layout for your keyboard). This will be what you flash to the board.
But first, for the t440p, you need to split the binary:
1
2
dd if=libreboot.rom of=spi1_8mb.rom bs=1M count=8
dd if=libreboot.rom of=spi2_4mb.rom bs=1M skip=8
Now you can proceed to flashing.
Tearing Down The Board
I recommend reading the official disassembly docs for this part, as they do a very good job describing what to disconnect. Below is a rough paraphrasing of these docs, but please look at the original too.
First remove the screws and slide off the back cover: 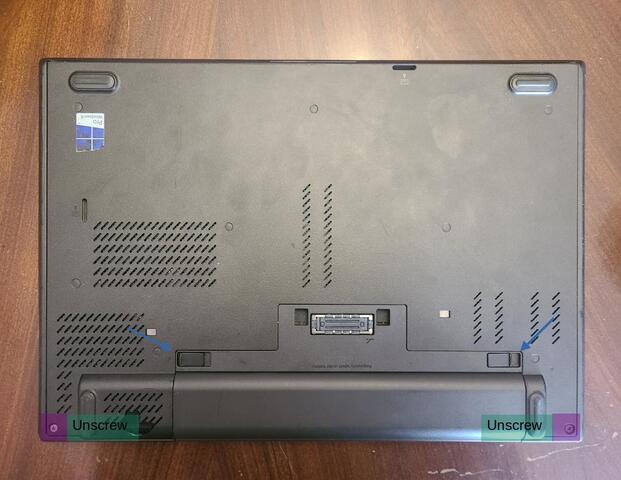
Then:
- Unplug the cmos battery
- Unplug and unroute the fan cable
- Unplug and unroute the black LED cable
- Remove all visible screws
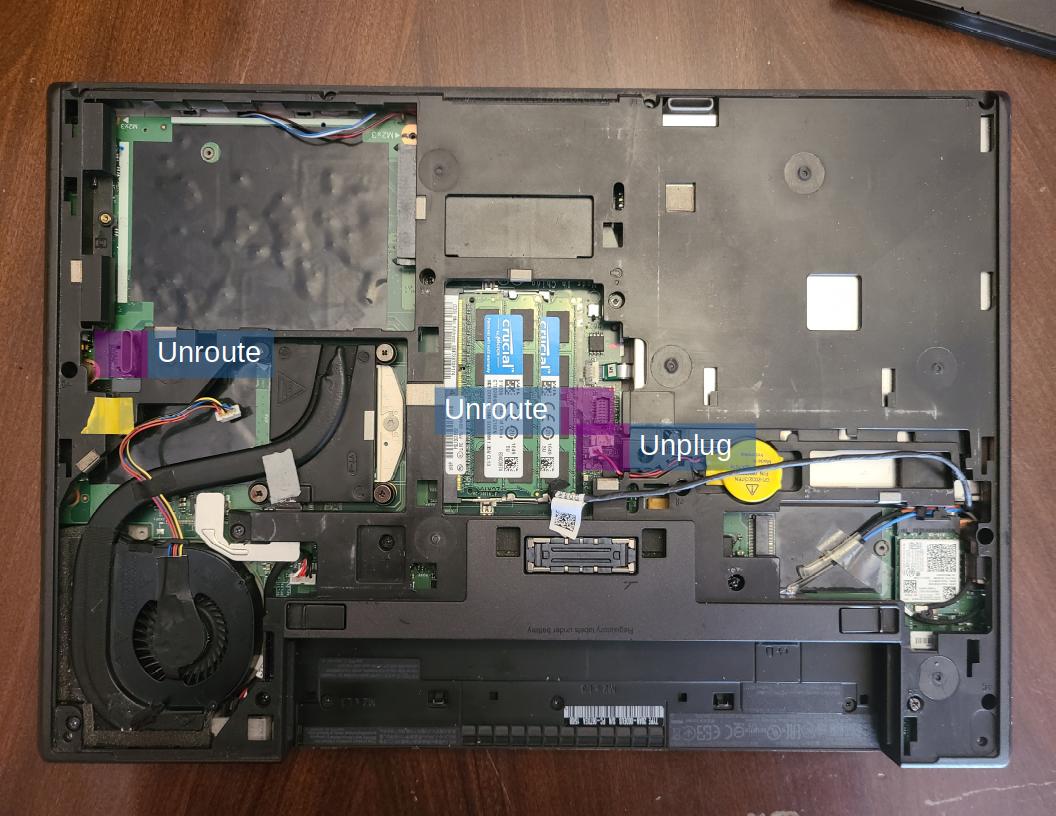
Now you can pull up around the sides of the bottom assembly to release it. Pull it upwards and lift it open to the front of the machine like a clamshell. Make sure not to break the wires connecting the assembly to the rest of the machine.
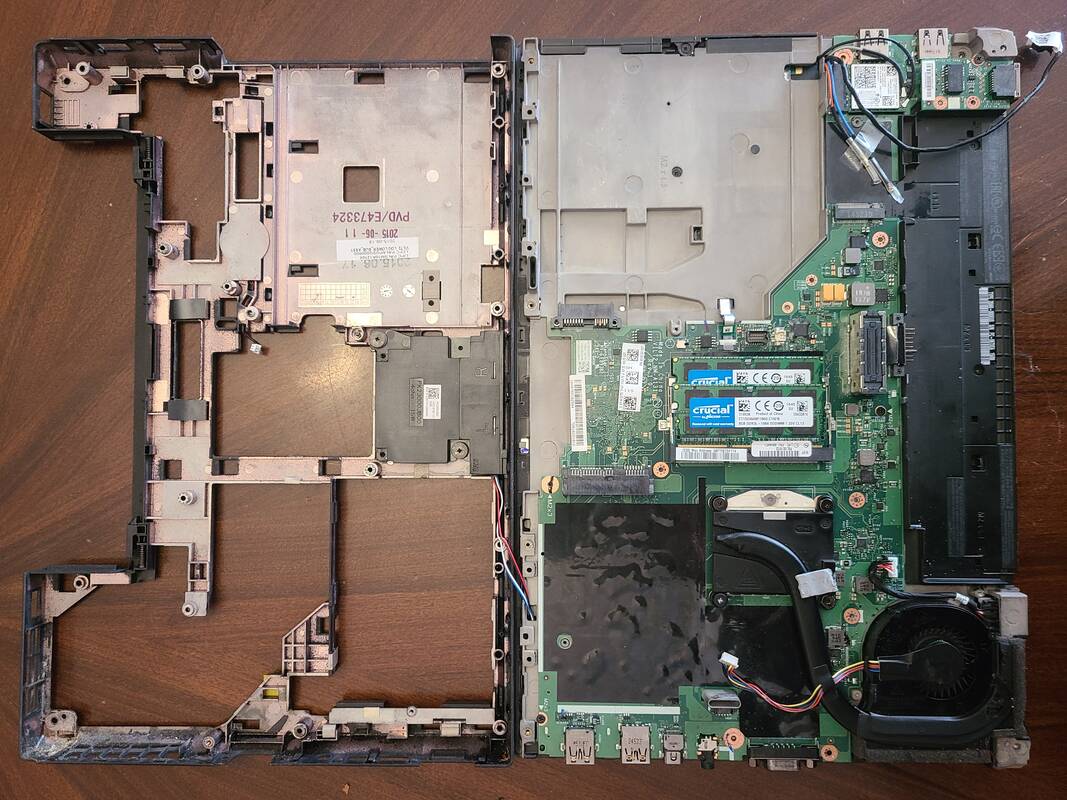
You can then spot the two SPI chips we need to flash on the board: 
Replacing The Wifi Card
At this point you can cleanly remove the wifi card from the device and replace it with a free alternative. I used the Atheros AR9462 AR5BWB222 as it doesn’t require binary blobs at all to use and can reach very good speeds for an old laptop.
Flashing The Chip
To flash I followed the recommended guide of serprog with a raspberry pi pico.
Initially I wired up an SOIC-8 clip, but found that making good contact was difficult (this is common when the chip is soldered to the board). I instead switched to using cheap test clips to hook the inidivudual pins and was able to cleanly flash both chips:
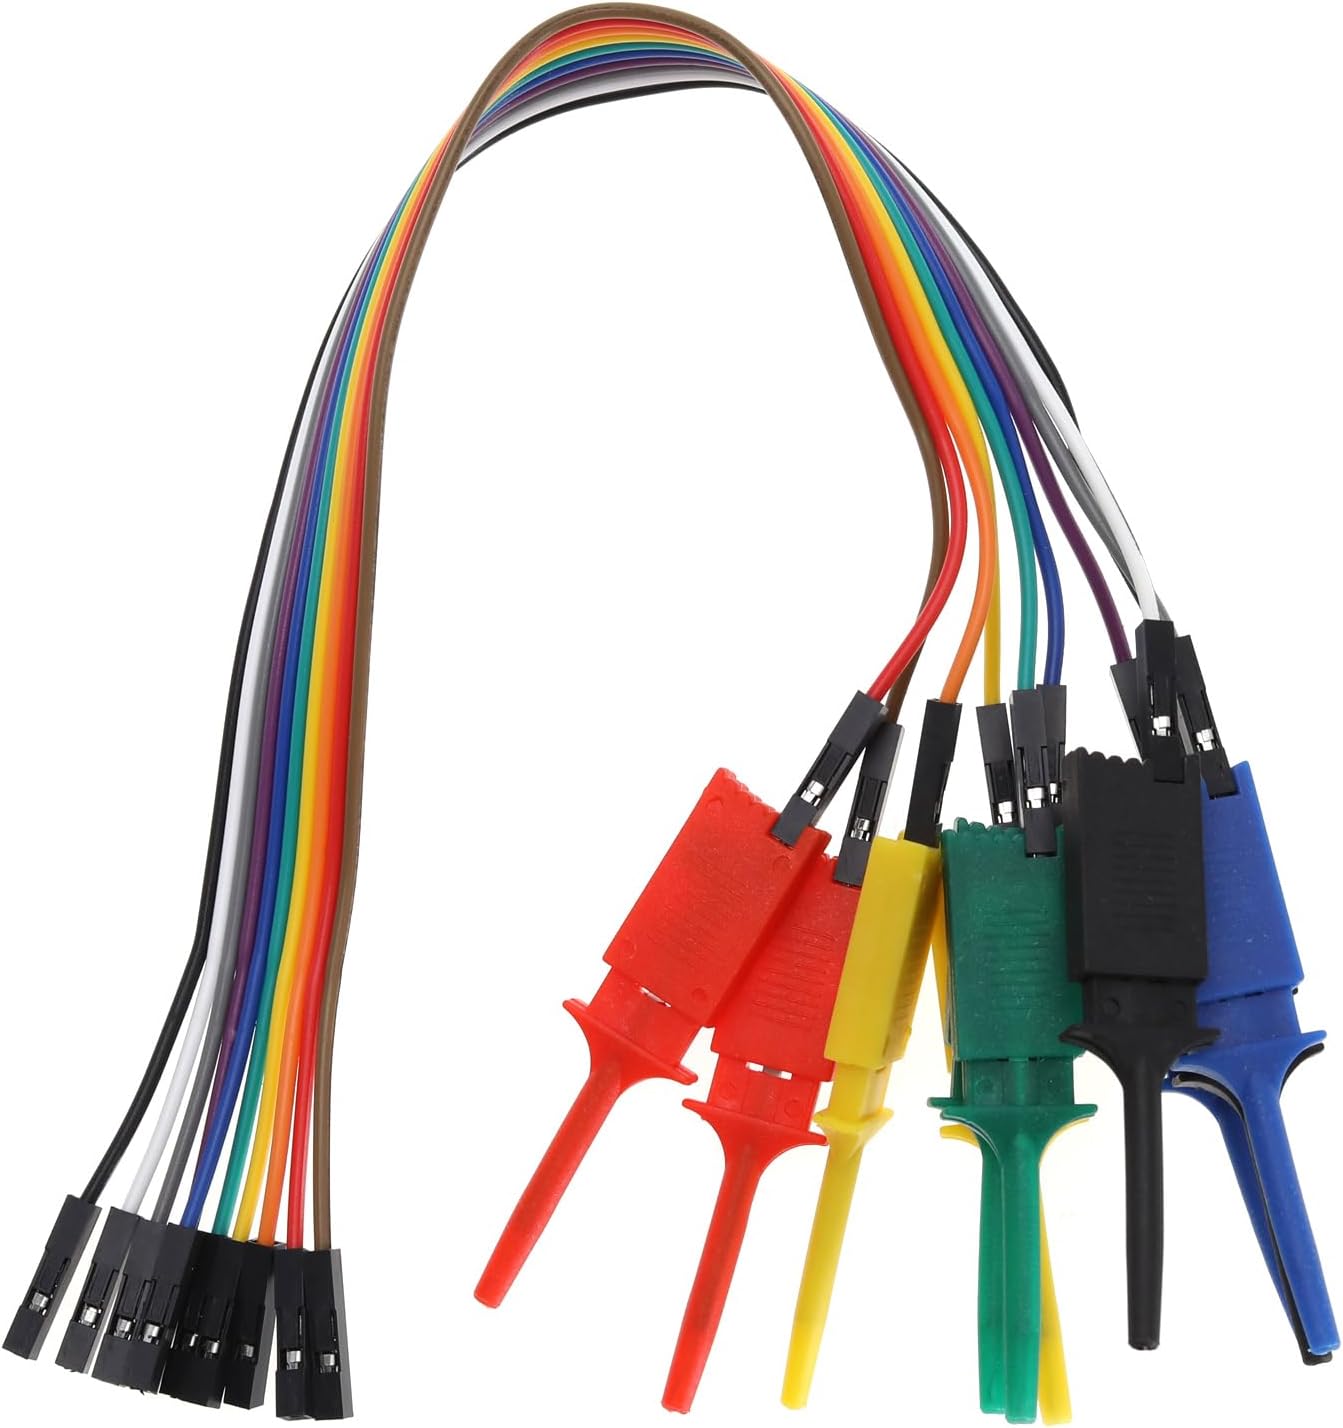
This definitely isn’t the approved/normal way but it was the most consistent way in my testing.
To flash the chip I wired up the clips to the pico, following this mapping: 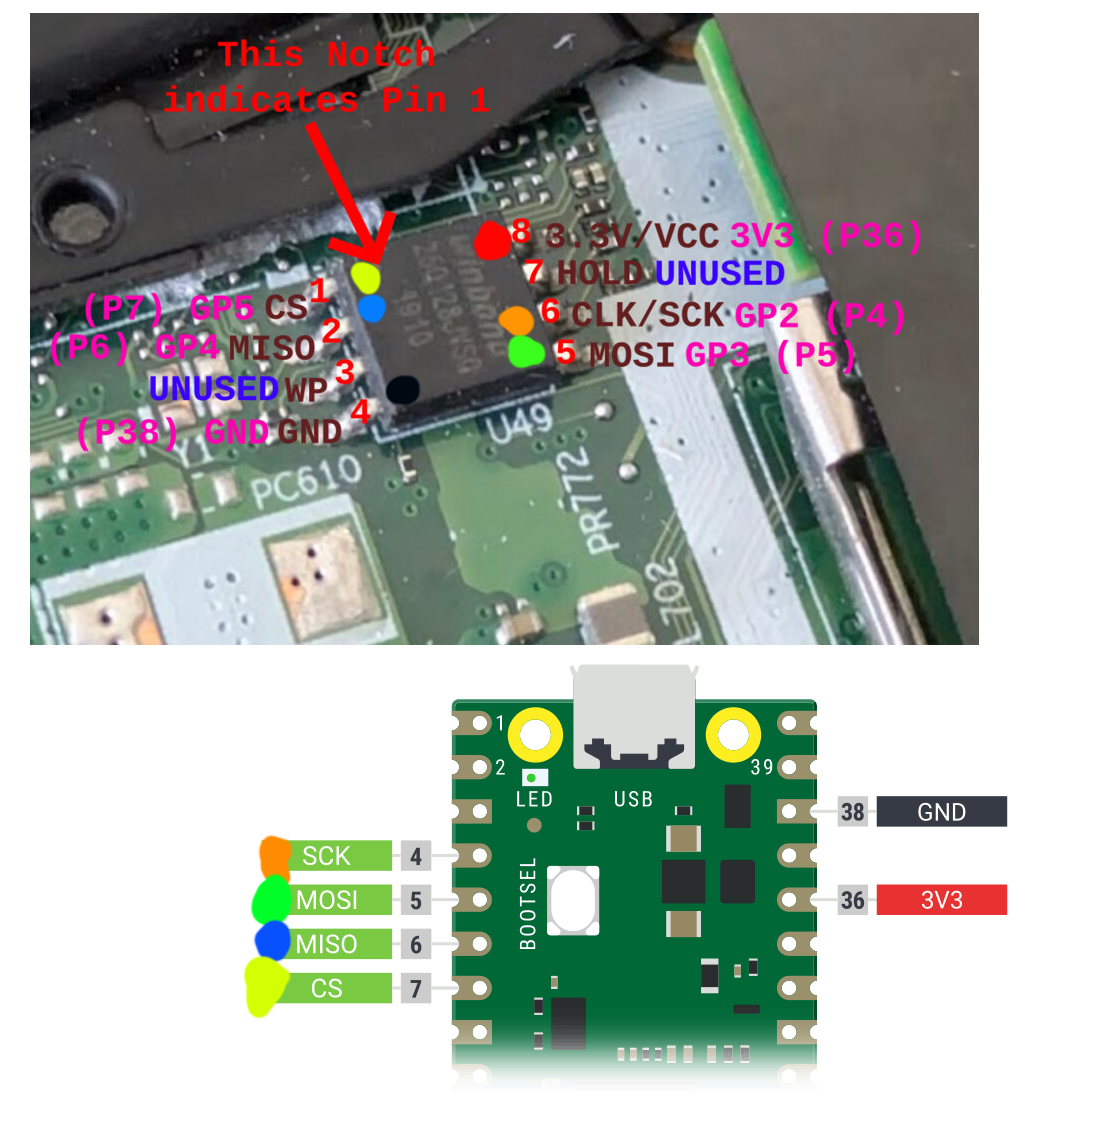
Which looked like this for SPI2: 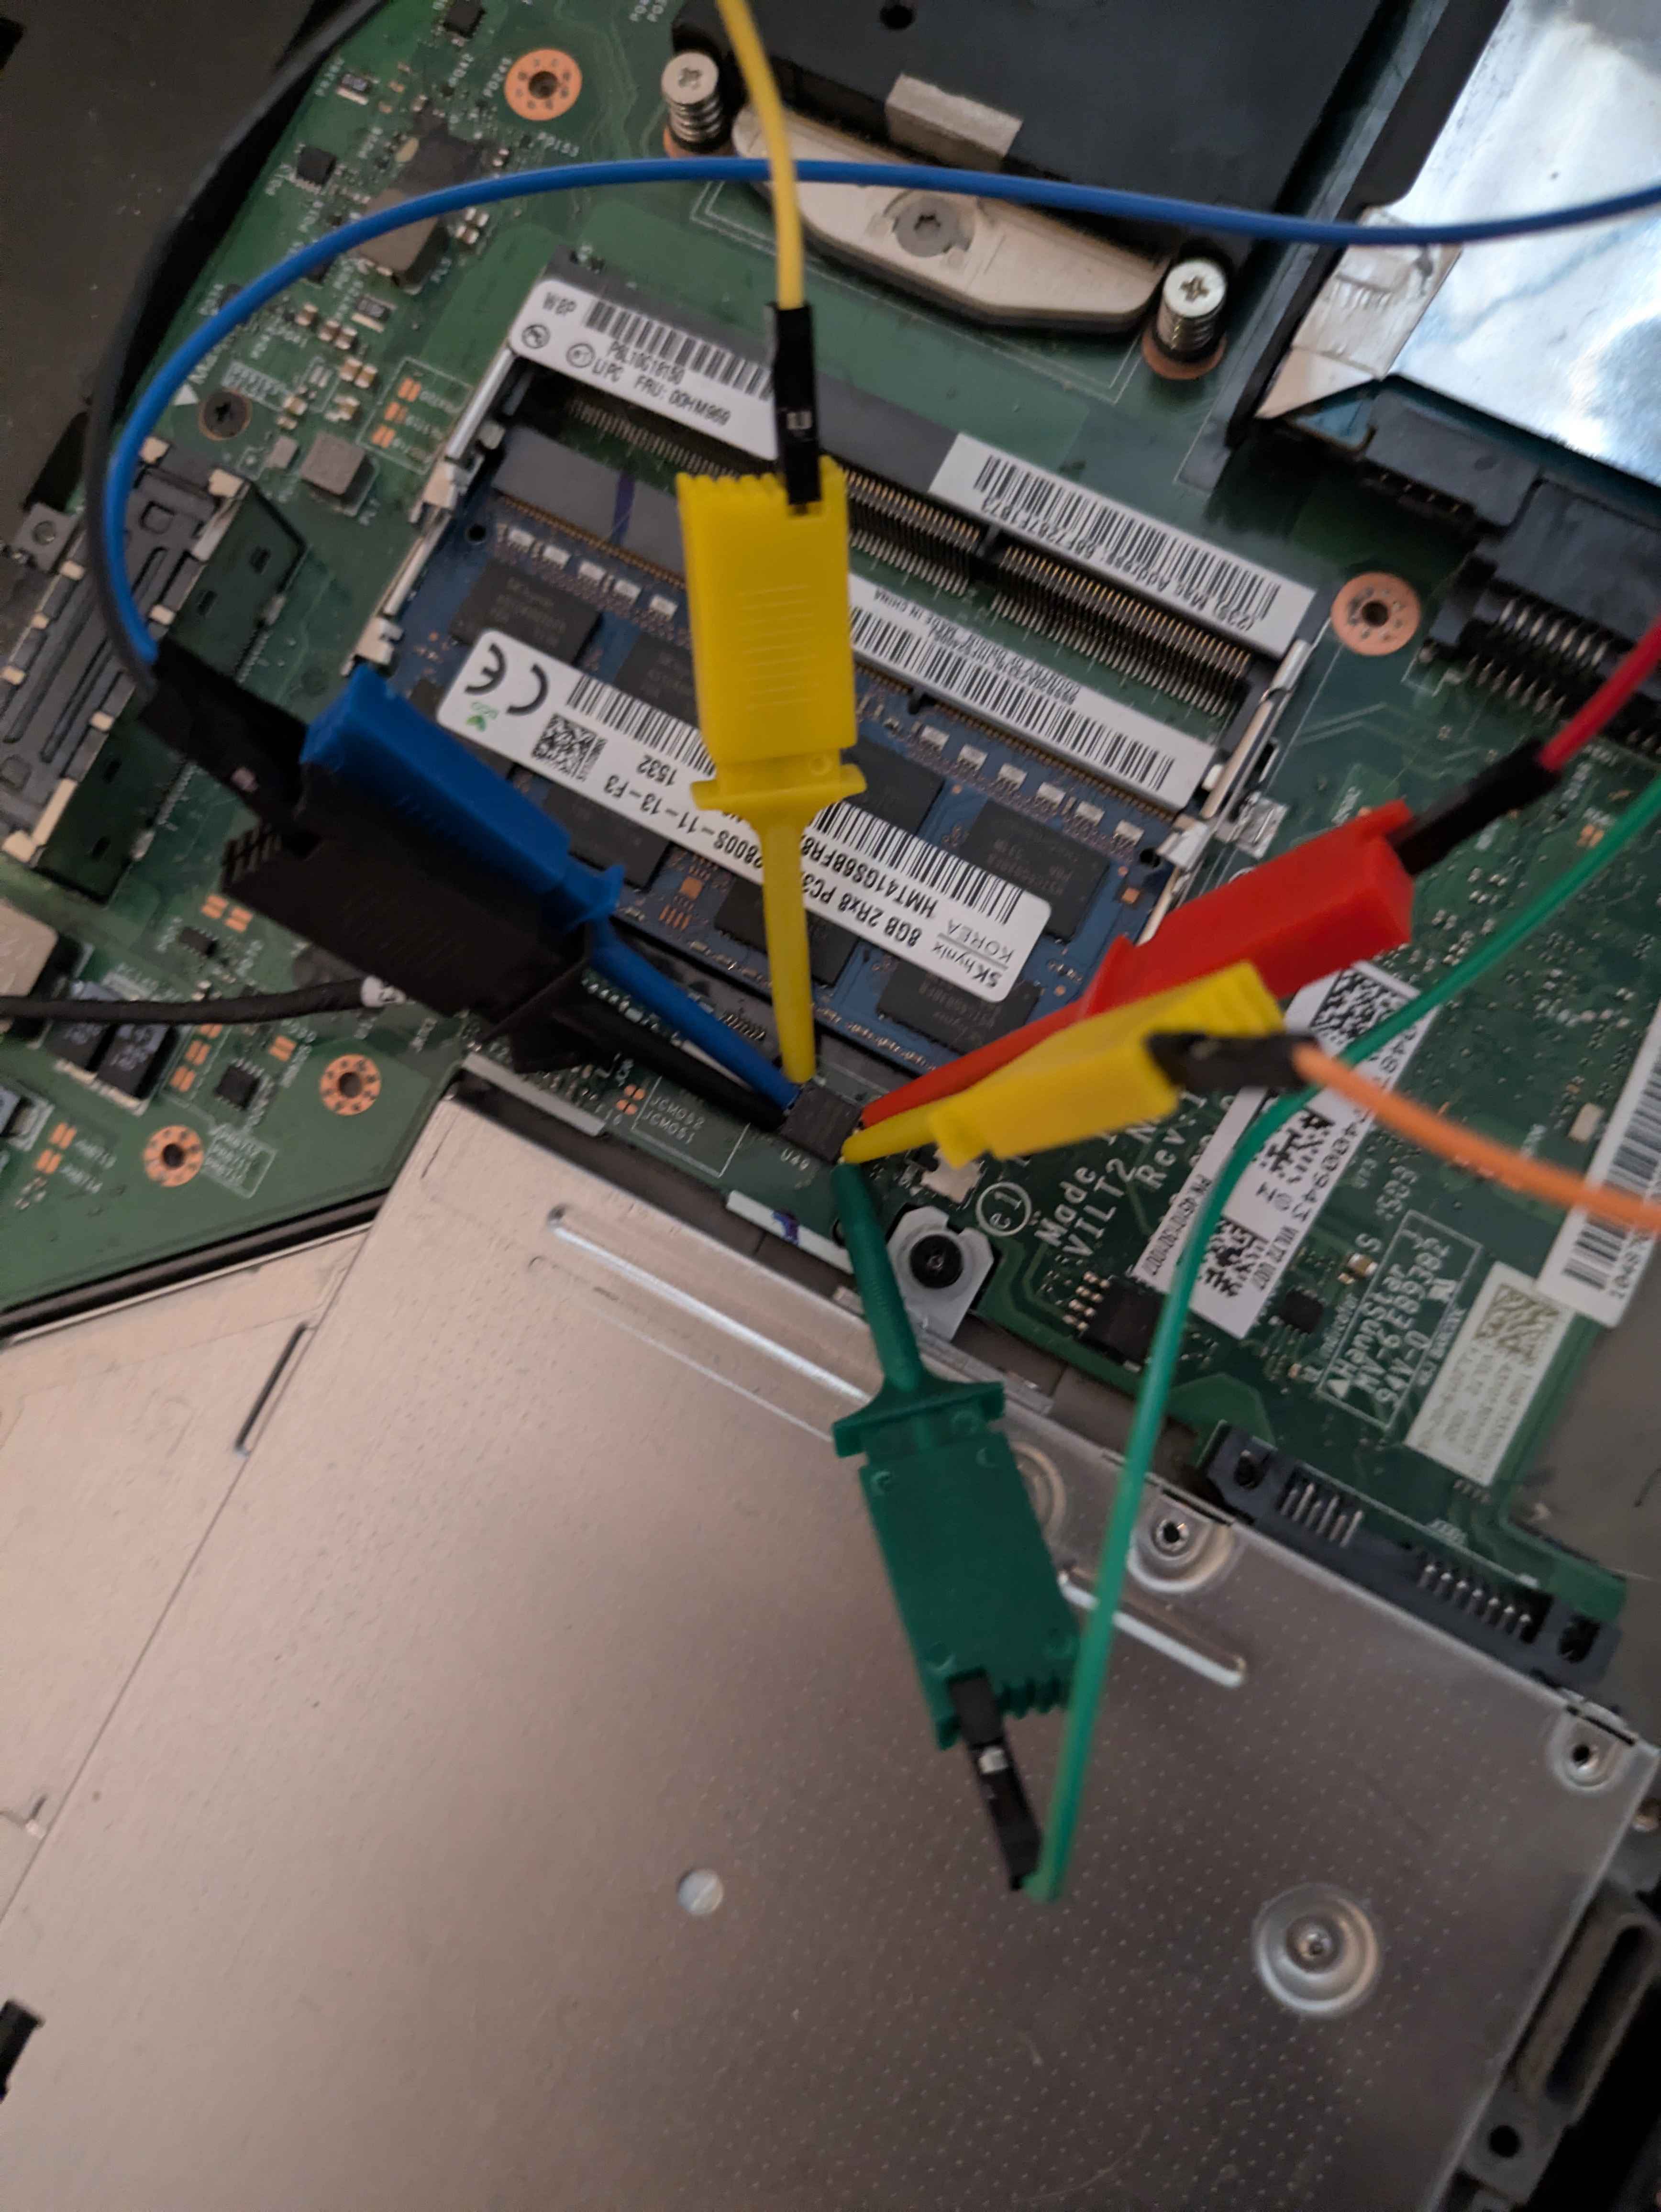
Then you have to build and flash the pico serprog firmware to the pico.
With the set up you can flash SPI1 by executing:
1
2
3
4
5
6
7
8
9
10
11
# Make a folder to store your firmware to be flashed
mkdir bin
mv spi1_8mb.rom bin/
mv spi2_4mb.rom bin/

# Make a folder for backups and write the SPI1 backup
mkdir backup
sudo ./flashprog -p serprog:dev=/dev/ttyACM0,spispeed=1M -c W25Q64FV -r backup/spi1_8mb_stock.rom

# Then flash SPI1
sudo ./flashprog -p serprog:dev=/dev/ttyACM0,spispeed=1M -c W25Q64FV -w bin/spi1_8mb.rom
And SPI2 by executing:
1
2
3
4
5
# Back up SPI2
sudo ./flashprog -p serprog:dev=/dev/ttyACM0,spispeed=1M -c W25Q32FV -r backup/spi2_4mb_stock.rom

# Flash SPI2
sudo ./flashprog -p serprog:dev=/dev/ttyACM0,spispeed=1M -c W25Q32FV -w bin/spi2_4mb.rom
Once the flash completes successfully simply reassemble and boot the device, and you should be greeted by the Libreboot BIOS, meaning your install was successful: 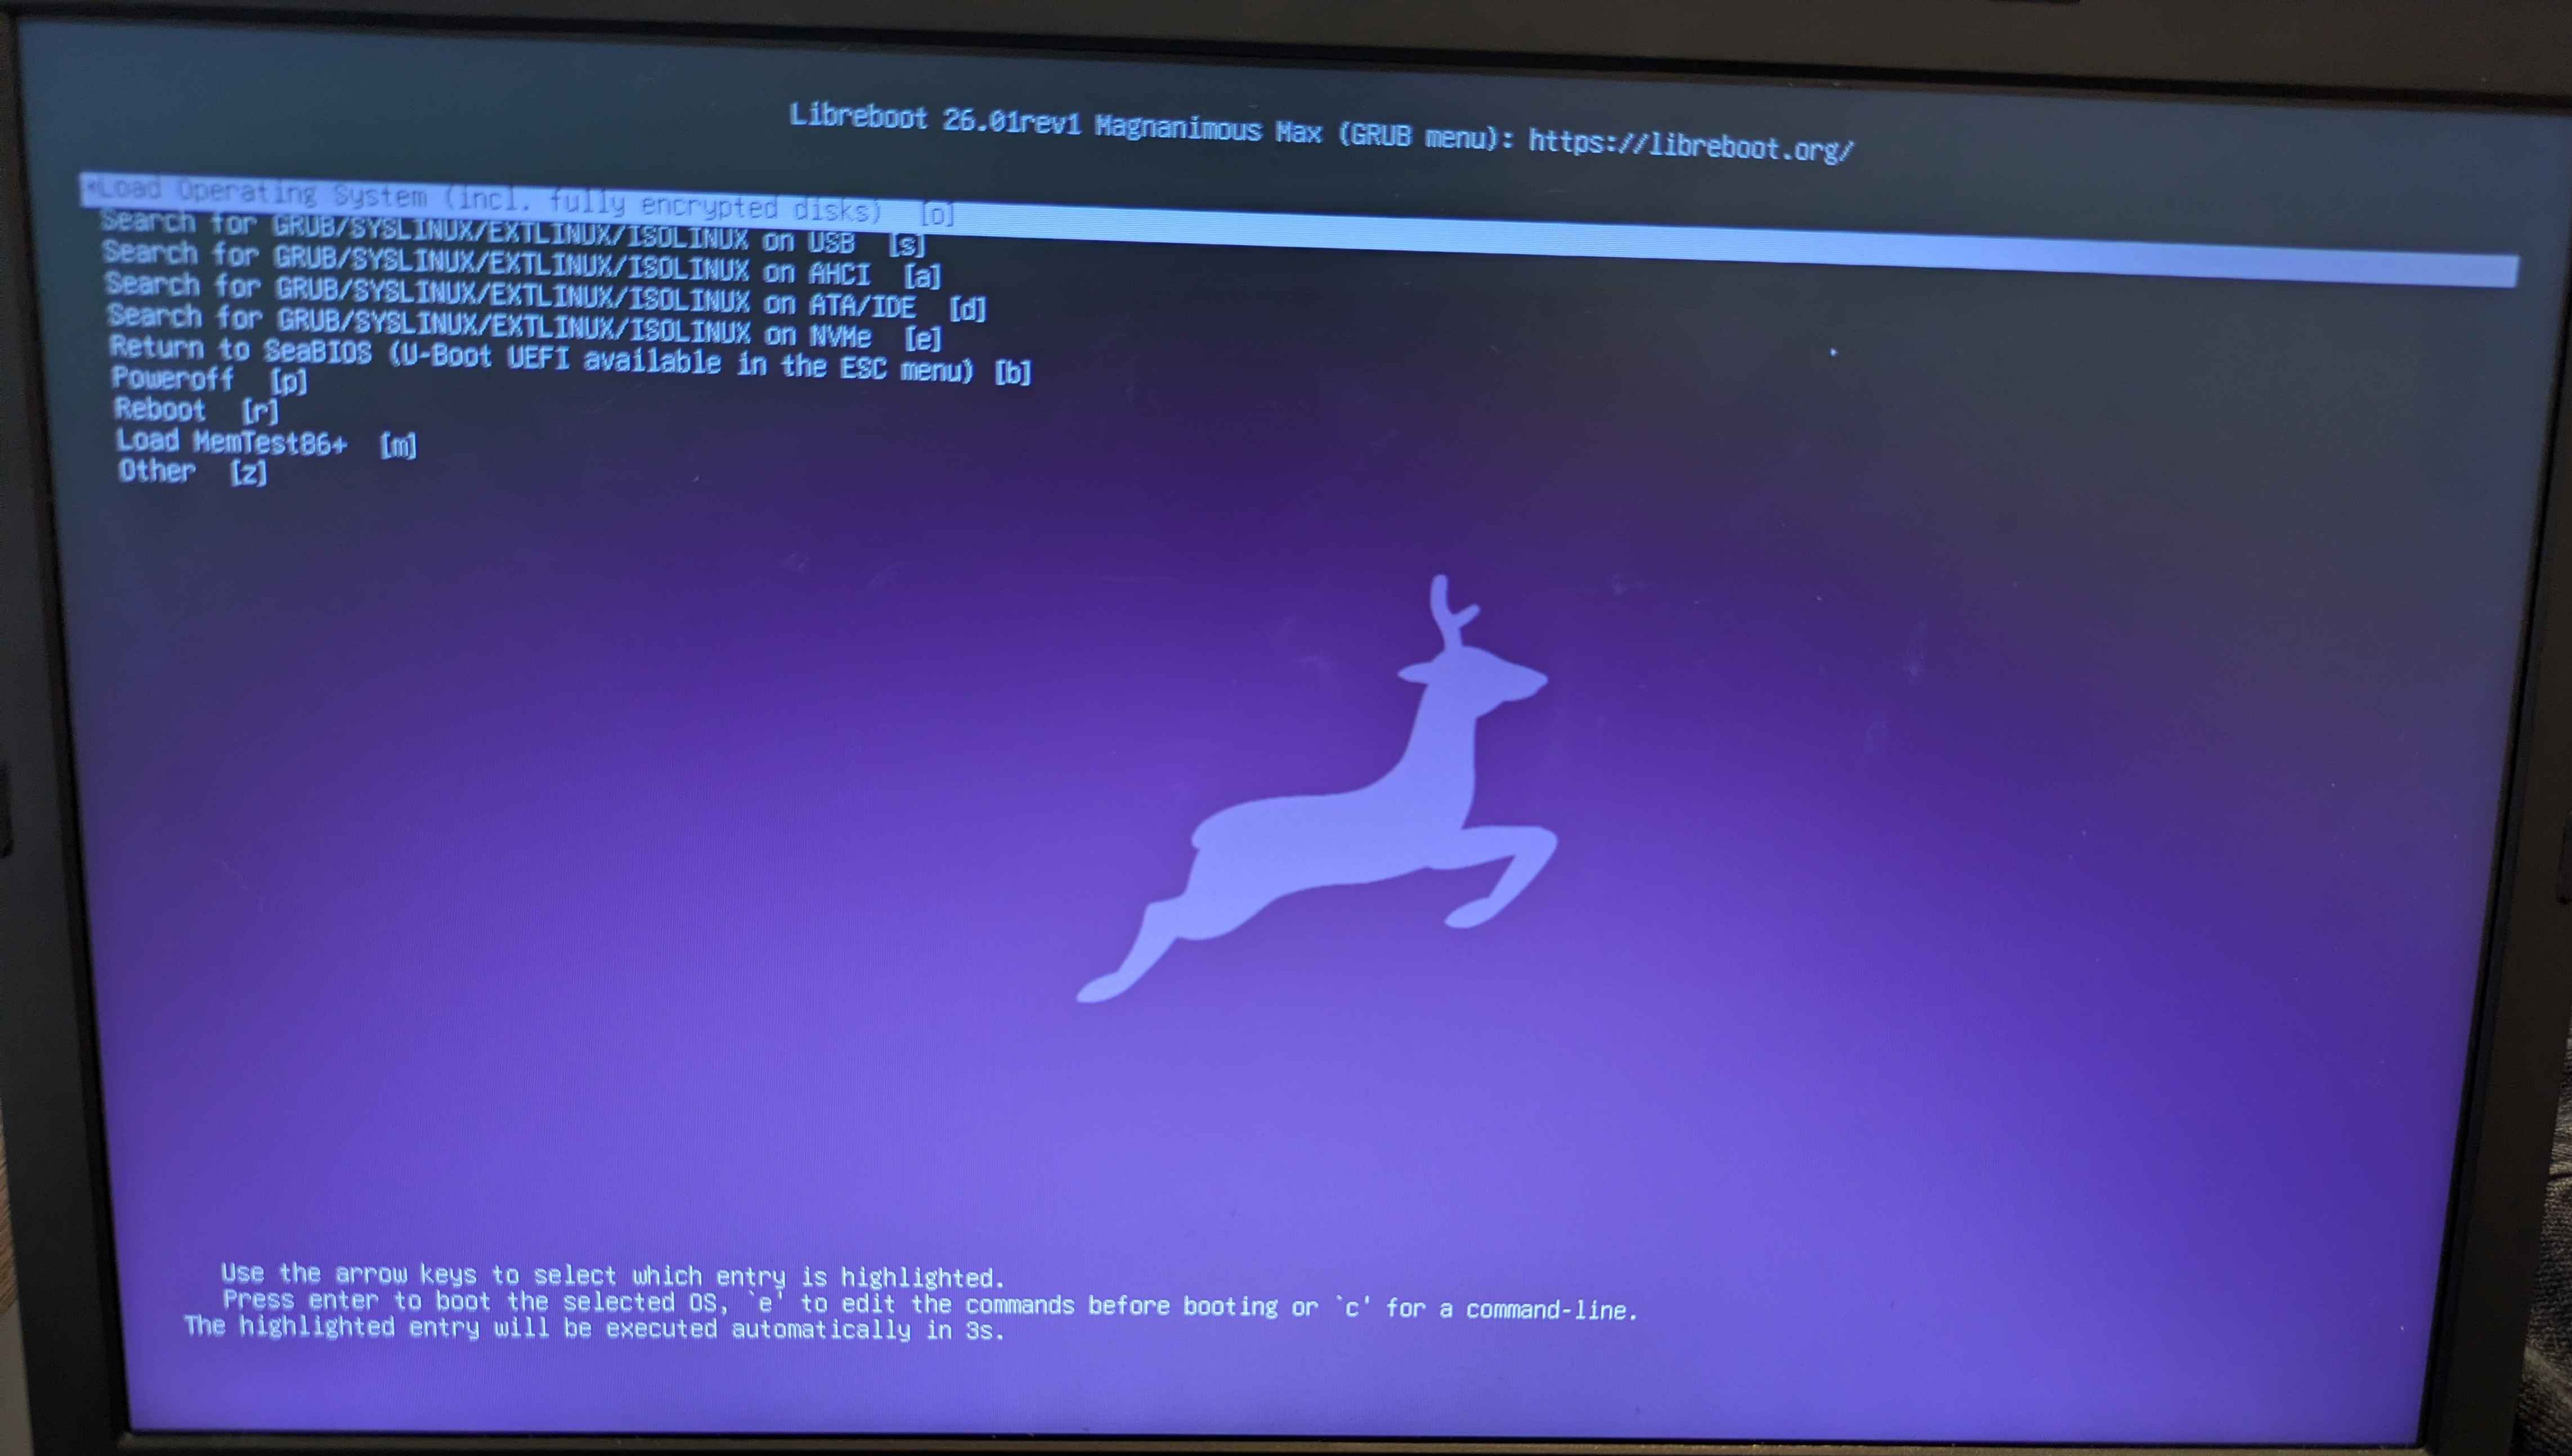
Installing GNU/Guix
Install GNU/Guix is the same as any other distro, assuming your hardware is fully free. Simply flash the .iso to a usb stick, boot into it from Libreboot SeaGRUB, and follow the install instructions to install it to disc.
The .iso can be acquired here (for the full operating system pick ‘GNU Guix System’ with the correct architecture, likely x86_64).
Conclusion
Installing Libreboot wasn’t as difficult as I expected, with the only major hiccup being getting good contact when flashing the chips. I was surprised to find that booting a fully free system I was able to use every single piece of hardware on the device correctly, and perform normal computer functions including:
- Loading a dvd, and playing it via VLC
- Connecting via ethernet
- Getting high internet speeds over wifi
- Compiling Rust and C code
I chose GNU IceCat as my browser, which disables JS on most websites (if it’s minified and therefore proprietary, or uses powerful features like reflection). I found that after whitelisting small js files on most sites, or using extensions to reroute to mirrors of sites, I was able to perform all my daily browsing fine.
Overall I am very happy with Libreboot and GNU/Guix, and I intend to use the laptop for my normal use cases related to personal and portable computing.